Animated Banner

Animated Banner
Cyber Generation For Better Future

Ads

Popular Article

Showing posts with label Tutorial. Show all posts

Sunday, September 30, 2012

How To Add A Program into Run Command

What is Run Command?
Run Command - Win XP

Run command is used to directly open an application or document whose path is known. It functions more or less like a single-line command line interface.

In the GNOME interface, the Run command is used to run applications via terminal commands. It can be accessed by pressing Alt+F2. KDE has similar functionality called KRunner, it's accessible via the same key binds. In the BASIC programming language, RUN is used to start program execution from direct mode.

Run Command on windows XP can be opened by clicking on "Run" which is placed on Start menu.

On windows vista and win 7, the Run Command still available, it's just doesn't appeared on Start Menu list.

Run Command - Win 7

How to open Run Command window in win Vista/7?
It's easy, just simply press windows button + R on your keyboard (press and hold windows button, then press R)


Windows Button on Keyboard

And now let's get to the our Main Business, about how to add a program into Run Command. There are some methods to do this:

Saturday, August 11, 2012

How to Download Video From Facebook - Speedbit

               Hi, today I'll teach you how to download video from Facebook using Speedbit video downloader.
Here we go...    

I. Installing Speedbit Video Downloader
1. Download latest Speedbit Video Downloader from here click Free Download to start the download and wait until it finished.

Click Free download

Thursday, May 24, 2012

How To Take A Screenshoot on Windows

Hello today we will learn about how to take a screenshoot...

What is a screenshoot? Screenshoot is a captured image of your desktop view that can be saved as an image file. This is very useful, especially if you found a bug on games, or some error from your PC and want to share it to your tech administrator.

How to take a screen shoot?

First, take a look around at your keyboard, there are so many buttons there, but only 1 Button you must aware the Print screen Button (Prt Scr)

Print Screen Button On Keyboard

Saturday, March 24, 2012

Public DNS

            Well, after doing some experiment about what happened to hypster like what I've said before in announcement, I figure it out that Hypster might be have been banned from my ISP, so I changed my DNS settings into Public DNS from google.

            I'm using a TP-Link router, and this is how I changed my DNS on my Router.

1. Open your Router Management address on your internet browser, how to find this address? It's on your Router Back, access it with your internet browser, type it's IP (as in my picture) : "192.168.1.1" in address bar, and then you'll be asked to fill username and password which are same as in your Router's IF you haven't changed it.

Wednesday, March 21, 2012

How To Check your Java and Flash Player Version

Hello all,

          If you don't know how to check your current Java version and Flash Player Version that is very important to run many browser applications and games, in this post, I will teach you how to do that in windows XP.

Check Your Java Version
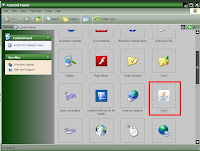
1. Click on startmenu > Control Panel
2. Open Java on your control panel list


Wednesday, October 12, 2011

Tutorial Cara Pasang Wi-Fi di Rumah

           Wifii? apaan sih wifii? kalau menurut Mbah Wiki, Wifii atau Wi-Fi (baca: Wai-Fai) merupakan kependekan dari Wireless Fidelity, yaitu sekumpulan standar yang digunakan untuk Jaringan Lokal Tanpa Kabel (Wireless Local Area Networks - WLAN) yang didasari pada spesifikasi IEEE 802.11 dst dst dst... (untuk penjelasan teorinya silahkan baca di sini).

Cara Setting Router untuk Wi-Fi

             Berikut adalah step by step secara detail mengenai bagaimana cara mengaktifkan dan melakukan setting password pada Router Anda. Dalam contoh ini, saya menggunakan google Chrome sebagai web browsernya, Windows XP dan TP-Link model TL-WR542G  (dengan updated Firmware Version 4.0.1 Build 081021 Rel. 48660n).

           Perhatian: sebelum melakukannya, harap baca hingga tuntas (kalau perlu dibaca ulang 2x hingga dipahami dan perlu teliti apa yang sangat perlu diperhatikan. Jika Anda tidak Yakin, Anda dapat meminta tolong kepada Toko dimana Anda membeli untuk setting Routernya, ataupun teman Anda yang berpengalaman di Bidang ini.

Monday, October 10, 2011

Windows 7: Robocopy

           Berikut adalah tips bagi pengguna windows 7, yakni mengenai bagaimana cara melakukan proses copy file yang lebih cepat daripada perintah copy yang biasa, yaitu dengan menggunakan fungsi yang disebut Robocopy (Robust File Copy). Sayangnya, fitur ini hanya bisa dinikmati oleh pengguna windows 7 aja.

             Dengan menggunakan Robocopy, proses copy direktori atau subnya membutuhkan waktu yang lebih cepat daripada kalau kita menggunakan perintah copy biasa. Dan hebatnya lagi, dalam windows 7 perintah ini telah mendukung fungsi *multithread file copy. 

               Ok... Ok... cukup penjelasannya, lalu gimana cara pakainya? Mari ikuti langkah - langkah berikut...

Unblock Image di Mozilla

hmmmm... baru aj kejadian kayak pengalaman dulu, mau nyimpen gambar malah salah klik ke block, jadi ilang semua gambar di websitenya.... apakah temen-temen pernah mengalaminya? jangan khawatir, berikut caranya untuk unblock lagi supaya balik lagi seperti sedia kala...

caranya:
1. Buka Mozilla kamu
2. Buka Menu Tools, lalu pilih Options.
3. Pada screen Options ini, pilih tab "Content"
4. Check (tandai) "load images automatically"
5. Klik tombol Exceptions yang ada di sebelah kanannya.
6. Cari website yang tadi ga sengaja kita block lalu klik "remove sites", atau kalau mau unblock semua tinggal klik aj "remove all sites". Lalu klik tombol Close, lalu OK.

sekarang coba direfresh deh browsernya (tekan F5 yang diatas untuk merefresh browser Anda).

Muncul deh gambarnya.... :D

Sunday, October 9, 2011

Cara download Video/MP3 dari Youtube

Teman - teman tentunya ud ga asing lagi dengan yang namanya Youtube, juga malah temen saya di dunia nyata sering nanya: Gimana sih download film dari youtube? (apalagi pas butuh video buat tugas kuliah)

Sebenernya jaman sekarang banyak tuh tools - tools dari si Mbah yang bisa dipakai buat download video dari Youtube dan website - website video streaming lainnya. Tapi kalo saya punya favorit tools sendiri, yaitu jdownloader (bisa diklik untuk langsung download toolsnya) tools simple dan free dari jdownloader.com.

Why? soalnya jdownloader itu gratisan (siapa sih yg ga doyan yg namanya gratisan?) + bisa jg buat download file - file dari website file sharing kayak ziddu, filesonic dan sejenisnya. Cuma kelemahannya adalah, untuk pertama kali download harus nungguin updatenya dulu.... dan makin lama ga diupdate makin lama juga updatenya.... :) ya... namanya juga gratisan, musti sabar.....

ok, tanpa membuang waktu lagi, kita mulai aja....
tentunya, langkah - langkah ini dilakukan SETELAH jdownloader di download, diinstal, dan ditungguin ampe updatenya selesai. :) ingat pepatah: berakit - rakit ke hulu, berenang -renang kemudian. Bersakit - sakit dahulu, bersenang - senang kemudian.... ;)

Step By Step : How To Install Oracle 10g

Ok, here's a guidelines about how to install oracle 10g. Hope, I didn't break any policies posting about this. :)

You need to follow this path to install the oracle. There's 3 Major steps you should do:

Installing Oracle Form and Report Builder

This steps for installing Oracle Form And Report Builder...
Insert the disc for oracle form and report builder or run the installer from you hard drive copy.

1. Click on Installer (setup.exe) from disk 1, and then wait for the installation process begin. Click Next to begin the installation.

Setup Enterprise Manager For The First Time

This Steps is very important, after the previous setup, an Enterprise Manager usually will be opened automatically after we exit from the installer. If it doesn't appeared, you can use your web browser to open it...
how to open it? open your notes, and find the EM address.

For example,mine is: http://118.136.32.239:1158/em

1. The screen will be appeared like this, you'll be see the login menu, fill in the username and password for "sys", the password is what you've set it at the installation menu, Choose Connect as "SYSDBA". Then click Login.

Setting up NetCA For Connection

OK... This one is the last one.... it's about how to set up NetCA for Connection.
1. Click on Run from Startmenu, type "cmd", and then OK. This will trigger command prompt, in command prompt, type "netca", then press return/enter.

Installing Oracle Database

This is the details guidelines for installing Oracle Database (I use Oracle 10g).
1.  Run the Oracle setup, and then wait till the installer windows appeared.... (this will takes some minutes or more)

2. Fill in the path Oracle Home Location (this path will be used for oracle database drive). Choose installation type: "Enterprise Edition", and then fill the password and password confirmation. (don't forget to note down the passwords if you need to) :)

3. Wait for the process until it's finished.


4. The checklist window will be appeared. See the checklist, and "check" the uncheck box (Failed), Click Next.

5. Click Install button to proceed. And then wait the screen till it turn like on next steps.


6. If you're succeed, the window will give you this kind of information. Write it down or just screen capture it. :) (Warning: you should write it down somewhere, because this screen very important and only appeared once). And then Click on Password Management to proceed.

7. Fill in the passwords for SYS and SYSTEM (make sure you note them too).


Click on Lock Account Column to make those users unlocked (just unlock users you need), also fill in the password for login. Click on OK to proceed.... (and the screen will be back to point 6, then just click OK to proceed).

8. The screen will show you the information that you need. It's VERY IMPORTANT to write it down. Click on Exit, and then Yes.


Congratulation, the database has been installed.... Proceed to next step... :)


Friday, October 7, 2011

Cara Memasukkan Musik Ke Blog

            Mungkin ada di antara teman - teman yang masih bingung caranya masukin lagu - lagu favorit kita ke blog atau webpage kita. Gimana sih caranya? Gampang kok, ikutin aja step by step di bawah ini. 

            Dalam tutorial ini kita gunakan situs Hypster.com sebagai acuan, sebab blog ini juga menggunakan situs yang sama untuk music playernya... :)